This article is about how, at Smartbox, we improved our release process over a period of around 2 years, going from ad hoc releases, with little structure and performed outside of business hours, to having fully managed processes and releasing during the day, only reverting to releasing outside of office hours if absolutely necessary.
When I joined, we had 2 teams doing releases of our public facing e-commerce website, each containing between 7 and 10 developers and testers, reporting to a Web Manager. One team looked after the e-commerce site, while the other took care of people who received one of our boxes as a gift. Now, there are around 8 different teams who could potentially release to the public website, as well as other teams releasing various ancillary micro-services.
Chaos
This story begins around 2015, when I joined Smartbox. At that time, we were a much smaller organization (~280 people in total, vs. 600+ today). The teams working on the platform worked in 2–3 week sprints and would do a release at the end of each.
Process
A team would get in touch with the Web Manager as they approached the end of a sprint and had a release candidate ready to go out. There was rarely any scheduling conflicts, so he would just say ‘OK, go live on Wednesday’ or similar. The release process would start going to pre-production during the day, followed by production at around 10 PM (everyone working remotely from home). When ready to begin on production, we would put the site behind a maintenance page, start the deploy (including any extra required steps), kick off the regressions and do manual UAT on production. To finish up by midnight was a rarity, but usually, we would be done by 2 AM, at which stage we would remove the maintenance page and go to bed.
It should be obvious that there were a number of issues with this:
When there were issues and the release dragged on, people would get tired and ‘just want to finish’
After the release was deployed, everyone would just go to bed and no further monitoring took place, which could lead to nasty surprises for your colleagues the next morning
There wasn’t a full set of engineers and management for support during the release if there was an issue
Why duplicate the UAT effort, when it was already done twice on a project and pre-production environment
On top of all this, there was no record of a release. The codebase is versioned with git tags but there was no centralized list detailing what was in each release, what team did it, issues encountered, etc.
Release Plan
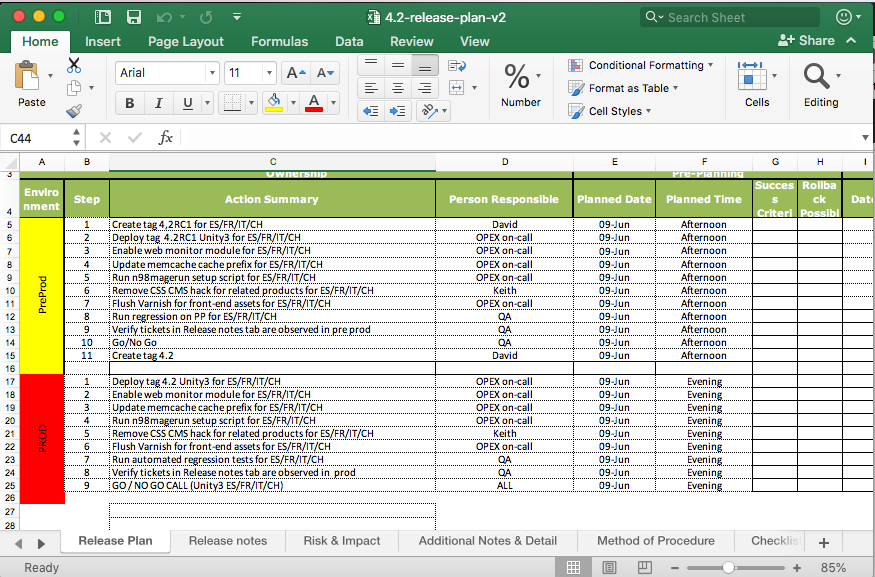
Each release would have (and still has) a release manager, to coordinate all the steps involved in deploying code. In preparation for a release, the manager would fill out an Excel spreadsheet of all the steps for pre-production and production; this was the Release Plan. Often certain tasks need to be carried out on the production server, and these would be done by an infrastructure engineer, so the Release Plan would have the extra info for them. This plan would just be emailed/shared via chat to whoever needed it and would essentially then be lost forever after the release. This also made it hard for a new release manager to come along, as they had no frame of reference for the Release Plan
A sample Release Plan from 2015. Note the Method of Procedure tab — there would be extra info in here, which required flipping between this tab and the Release Plan tab — awkward! Also, the list of tickets went into Release Notes — a manual copy and paste effort
While we’ve always had a suite of unit tests, it was up to the developer to run them locally and ensure nothing had broken. However, sadly the tests weren’t always run and there were instances where we would release code with a simple unit test bug in it.
We also had no way of tracking database changes, or what state the database was in. In Magento (which is what our e-commerce platform is based on), to do a DB change, you write a script called an installer. The installers are versioned in Magento, so it’s possible to tell what state the DB is in by looking at the current version of each installer. Often, when deploying, either the installer wouldn’t run, or there would be a DB refresh on pre-production and various other issues. This resulted in a lot of lost time trying to figure out why various functionalities were broken. We had no way of definitively and easily saying ‘this is what the database should look like’ after a deploy.
Summary
Infrequent, nighttime releases
Nothing was tracked or centralized
Buggy code got released
Improvements
The company knew it was about to expand its workforce massively over the next few years, since it was acquiring competitors and had big plans to build a brand new back-office infrastructure. More development teams was always going to result in more releases, so it was pretty evident that we were going to need a new process whereby there could be a release every day or even multiple releases on the same day.
Additionally, not all these teams would be working on the same codebase. This enabled a relaxing of the restriction that one team could release per day. However, we still needed more control over who released what and when
Process
We started by having a weekly meeting on Fridays, where the Manager or Tech Lead of each team looking to release the following week would attend, explain what they were releasing and when they wanted to do so. The meeting was coordinated by the ‘gatekeeper’, although that phrase never really caught on! It was all very analogue and manual, involving hand-drawn calendars, lots of (amicable) discussion and the gatekeeper keeping track of everything. When everything was decided, an email would be sent out with the plan for the following week.
Another improvement we made at this time was to begin releasing during the day. We realized the maintenance wall was overkill for most releases, especially ones that weren’t changing the structure of the databases. We also reduced a lot of the required UAT, since it had already been done on a different environment, so it was a pointless duplication of effort.
Move to gitlab, Continuous Integration/Continuous Deployment
It was at this point also when we moved from doing everything in Git via the command line to having our entire codebase hosted in gitlab. This meant building a release candidate would be as simple as clicking a ‘Merge’ button for each ticket in your upcoming release. Other tasks like merging to master, creating a tag, resolving conflicts could all be done via clicks of the mouse.
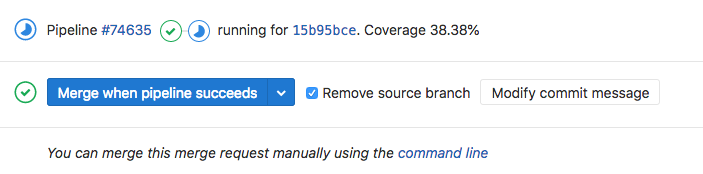
Moving to gitlab also enabled us to begin initial attempts at CI/CD. As mentioned above, often a developer would commit PHP code on a feature branch that broke a PHP unit test. To alleviate this, we built pipelines in gitlab so that when a branch was pushed, we would run the unit tests in a docker container and only when the pipelines were successful could a feature branch be merged into a release branch.
gitlab integration: only merge after the tests have passed
Once we had that pipeline in place, we were able to add other pipelines, e.g. to generate our zipped up Javascript app.min.js file, a PHP Composer run and we even started to work on a front end unit test suite using Karma and PhantomJS.
Release Plan
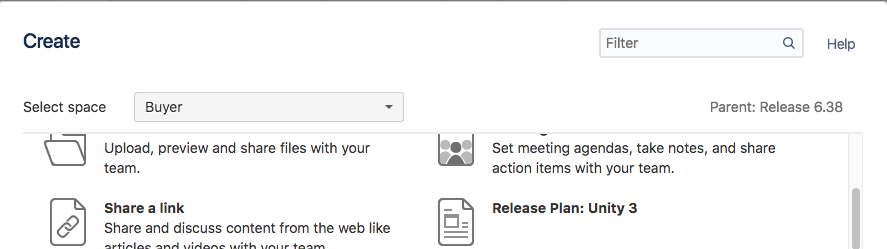
Around this time, we moved away from our in-house wiki and started using Atlassian’s Confluence instead. This allowed us to create a Release Plan Template, which could be used as a basis for all Release Plans. In this template, we added every single conceivable step that could be requested during a release, with all the extra information in the one document. So, when someone started doing a release, all they would have to do is create a new file using the template and generally remove steps. Obviously, anything very specific to that person’s release could also be added in as appropriate.
Using these Confluence templates also meant that we now had a single source for all release plans and they could be shared with a URL, worked on at the same time and kept up-to-date.
Easily create a new Release Plan using this template
Summary
Daily releases, weekly release planning meeting
Use of gitlab, pipelines for verification and asset generation
Standardized and centralized release plans
Sanity
Process
As we continued to grow, the company hired a Change Manager, with a proper background in change management. This Change Manager is still in place today and closely follows all releases throughout the company, to make sure they’re progressing, there are no clashes and that everything stays organized. Several chat rooms around release coordination, production issues and the like were created, which helps people collaborate on who’s doing what and when.
We started using a system called Service Desk to track all changes, or Production Change Requests (PCR) as they’re called. An advantage here is that a record of ALL changes are maintained, with issues and resolutions attached, so it’s very easy to go back and see what happened, and most importantly: what was the solution, if an issue re-occurs.
Finally, we introduced a morning standup, called the Change Advisory Board (CAB) where people talk about what they’re hoping to do over the current and following day, as well as discussing any on-going production issues.
So, we’ve gone from ad hoc releases to having the following well-established process:
Build your Release Plan
Outline your change in a PCR on day-2 (or earlier!)
Go to the CAB on day-1
Announce you’re ready to release in a chatroom on your go-live day
Start releasing when you’ve got confirmation it’s OK to proceed
If one does encounter issues while releasing, these are also now tracked in the Release Plan, along with any corresponding tickets that are raised for other teams to fix. Every Monday morning, there is a meeting to discuss issues teams faced the previous week and to ensure these are being resolved by the Operations team. This ensures we don’t keep facing the same problems (repeat offenders) when releasing and that problems do actually get fixed.
Release Plan
Not much has changed in the Release Plan. The overall structure has evolved into different sections, we track the timings for each step, as well as issues encountered, as mentioned above. We also include results from automated tests, which helps to see if an issue has occurred before.
Summary
Have a dedicated change manager
Centralize and track ALL changes
Communicate everything you’re doing in a standard way
Dreaming?
Ultimately we would like to move to a true Continuous Integration set-up, whereby when you finish a ticket, you simply merge to master and everything from there is automatic. We would move away from having Production and Pre-Production servers, to having a Blue/Green set-up, where both are Production-ready and it’s simple to flip between the 2. The release process would then consist of a developer doing the following:
Merge branch to master
This kicks off running the unit tests
Deploy master to ‘blue’ server on success
Run the regressions
Flip ‘blue’ and ‘green’ servers on success, so blue is now serving the code and includes the branch just merged
We’ve put a certain amount of this in place, with gitlab and the pipelines, but we’ve some way to go before we achieve this dream scenario.
TL;DR even the summaries
Centralize and track ALL changes!
Automate as much as possible (pipelines, unit testing)
Communicate in a standard way (i.e. have a fixed place/process to announce what you’re doing)
So, I recently started a new job as Lead Developer on carsireland.ie and one of the first things I was tasked with was moving the codebase from a simple PC running Linux to the cloud, so that it could be accessed remotely, outside the office. Now, while I do prefer Git, SVN is still reasonably popular, especially with websites older than a few years, hence the CTO wanted to stick with it, for the time being at least! Needless to say, most of the following is best done as root, or at least with sudo privileges. Also, this is done on Ubuntu, hence the use of apt-get.
1. Setting up Apache for HTTPS
Apache was already running on the server, but it had to be enabled for HTTPS. Firstly You need to generate self-signed SSL certificates. You’ll be asked for a passphrase; enter one and note it down:
a2enmod ssl
a2ensite default-ssl /etc/init.d/apache2 stop; sleep2; /etc/init.d/apache2 start # this last step is how I restart Apache. # I don't trust the 'restart' option. There's probably other/better ways of doing this
2. SVN
Install SVN and it’s Apache module
1
apt-get install subversion libapache2-svn
Create a new folder for the code (we’ll call the folder ‘svn’):
1
mkdir/home/svn
Create the repository:
1
svnadmin create/home/svn
Tell Apache about the repository:
1
nano/etc/apache2/sites-available/default-ssl
This opens up the pretty simple nano editor. At the bottom of the file, before the final <VirtualHost>, add:
You may need to enable your SSL site, so if the files /etc/apache2/sites-enabled/000-default-ssl or /etc/apache2/sites-enabled/default-ssl don’t exist, do:
For Apache to be able to read/write to the repository, we need to change it’s owner to www-data:
1
chown-R www-data:www-data /home/svn
Next, we need to add some login details for users, i.e. developers (you’ll be asked to enter a password):
1 2 3
htpasswd -c/etc/subversion/passwd user_name # user_name should correspond with the username of some one you want to have access to the repository. # The password entered can be different from their normal login password and is used to access the repository at all times.
For subsequent users, drop the -c flag above.
Restart Apache (however you want to do it). Following from above:
You should now be able to view the initial empty repository at http://server.locaton/svn where ‘server.location’ is either an IP address or a domain, depending on how you’ve set-up the server.
If you have an SVN dump of your repository and you want to load it into the new one, you can simply do:
1
svnadmin load--force-uid/home/svn> dumpfile
At this point, your SVN server should be up and running and ready to take commits. You may need to play around with the permissions of your /home/svn directories, making certain ones executable/writeable to Apache. If I’ve left anything else out, please let me know in the comments.
Last month I resigned my post from daft.ie and am about to take up a development position with dotMobi, a leading mobile Internet services company. I had done interviews with several places, while reading plenty of articles on various other companies’ hiring practices. At the end of these couple of months, I came to the conclusion that in all my professional career, Daft had the best hiring process for a developer that I had ever both experienced and read about.
The process
Initial interview
First up, as with all jobs, you submit your resume/CV. This is then screened over by the development manager, who invites adequate candidates to a first-stage interview. This interview consists of him and another developer, basically going through the CV with the candidate, asking some general programming related questions, all just to try and get a better overview of the person, ensuring they pass the “no jerks” policy.
Programming Assignment
This is the main beauty of their hiring process, and is discussed in more details below. Candidates are given an assignment to work on in their own time at home, typically over a weekend. The assignment asks the user build a simple web form, with one text input to take free-text search strings that a user might enter when searching for property. They even give sample queries, such as “2 beds for sale in Dublin”. This string is to be submitted to a PHP script where all the necessary data is to be parsed from the string. Once parsed, a call is to be made to the Daft database via their API in order to get a list of results back. This result set is then displayed to the user. Finally, they need to write-up their code, explaining what’s going on in simple English.
Second Interview
Assuming you do a good job in the assignment, you’re then invited back for a more formal interview with senior management (company of about 60 people), to discuss career aspirations, salary requirements etc.
Why I think this is great
Skills it shows
As mentioned earlier, the key part of the process is the programming assignment. First up, the initial entry form and data submission. Here the user can show their knowledge of web security, CSS, (X)HTML standards and more. While none of these are actual requirements, it’s an easy place to show existing, fundamental web knowledge.
Once the data’s at the server, cleaned and verified, relevant data blocks (e.g. area, for sale/to let, number of bedrooms etc.) need to be parsed from the string. There are a number of different ways to do this and gives the developer plenty of scope for flair. A certain amount of analysis is required here also, mapping the domain of real estate to known keywords and looking for these in the string.
You also need to try and spot any relevant areas (e.g. County Dublin, Galway City etc.) the user may have entered. Without going into too much detail (in case potential candidates are reading this), there’s a key optimisation when doing this via the API and it’s a great way to spot those who have been programming seriously for a few years. Even if a programmer doesn’t implement this optimisation, they should still be aware of the problem it solves; this awareness can come across in their second interview, which is also accepted.
Once you know what the user is searching for, you then need to build a call to Daft’s SOAP API. This is good because it usually requires the candidate install PHP’s SOAP interface. While not overly complicated, it’s not trivial either and shows that the candidate is able to play around on a UNIX machine. Using the API also illustrates a candidates ability to follow documentation and quickly get to grips with a new system. Finally, by building a query from your parsed data that can be understood by the API, the candidate again has a chance to show some good, tidy code.
After pulling data from the API, the candidate again has a chance to show off XHTML/CSS skills to display the results set. Further ‘enhancements’ could be shown by doing all this over AJAX, without a page reload.
Finally, the candidate needs to document their code. This will illustrate communication skills, their attention to detail, writing skills (grammar, spelling) and more. Everyone in the software industry knows that communication is a large part of software development and it’s important to have good communicators on your team. Good code followed by an average write-up can often be less preferable than average code (which is generally easier to improve on) with a good write-up.
Why it’s better than others
While reading about other people’s interview experiences, one thing that stood out as annoying most developers is white-board coding, i.e. where you’re required to write some code on the fly, either on a white board or piece of paper. This a completely unrealistic situation and is asking a programmer to do something way outside their normal environment. Similar to this would be writing a program in the employer’s office in the space of an hour to 90 minutes; again this is wholly unrealistic as programmers are used to their own environment, have their own tools etc. The beauty of the Daft assignment is that it’s too tricky to do in less than two hours, plus they let you do it at home on your own machine. Yes, this does allow for potential plagiarism, but once you’re offered a job, you’re put on 6 months initial probation, so if you don’t code your assignment it’ll soon become obvious and they’ll have scope to not make you permanent.
Another great thing about it is that there’s no generic analytical questions such as “Why are man-holes round?” or “How many ties were sold in New York City last year?”. The value in asking these questions is surely waning these days, as they are easy enough to prepare for and people have learnt to expect them. Good programmers need to be good at analysis, but enough information about a candidates skills can be gleaned from how they approach the assignment.
Finally, there’s no over-bloated 7 round interview process. From the 2 interviews a candidate does, coupled with the assignment, it’s very easy to see what a person is like and that they’ve a decent level of programming competency.
One flaw
Not everything’s perfect and after chatting to my manager about the interview process, in preparation for this blog post, he pointed out that it’s poor at highlighting any “rockstar” programmers, as well as any existing systems administration skills. So, if you have 2 people competing against each other, one a decent programmer, the other amazing, it can be hard to differentiate between the 2; what’ll happen more often than not is that the ‘nicer’ one will be offered the job first.
Conclusion
From the above, it should be easy to see that current interview processes are far too complicated. 2 interviews will always be the least that’s required, but when you throw in a slightly complicated programming assignment, there shouldn’t be need for much more. The assignment’s a good way to test programming competency while the interviews are good to test a person’s likeability and career aspirations.
I’ve written the front page and an ajax handler for a web application using Python and web.py. Here I give my thoughts on using a niche product (web.py) and some of the coding issues I had to figure out on my own, in case some one has similar problems.
I work as a web developer for daft.ie, Ireland’s largest and busiest website and have been there since August 2008. In my 2+ years of professional web development, I’ve come across many tips and tricks, which I’d like to share with anyone who’s interested. Alot of them have come from serious browsing for solutions on Google, Stackoverflow and the like, while some I’ve come up with myself. My main aim here is to share my knowledge by providing (hopefully) simple guides for people with similar problems, to save them the hassle I went through originally!